Presenting and Recording Lectures with Ubuntu Linux
The purpose of lectures is to transfer knowledge from the lecturer to students. There are different ways to make that knowledge transfer successful. In this article I will focus on just one method (and not necessarily the most important): presenting lecture notes and other supporting material to students during the lecture (as well as making that material available for study before and after the lecture). Specifically, I will explain the steps I use to present my lectures and make the material available to students. The steps I use are necessary to meet a set of requirements I have when teaching computer networking and security:
- I like to use lecture slides to present, and for students to have a printed copy in front of them during the lecture. They should spend most of the time listening, thinking and asking questions, only a small part of the time taking notes.
- There are many examples, usually involving calculations and/or drawing diagrams, that I need to present during the lecture. I want to work through the examples during the lecture, and also allow students to follow the examples after the lecture (especially when there are complex calculations that I gloss over). Although the format of the examples are prepared in advance, sometimes the numbers used may differ (e.g. ask a student to select some values).
- Some aspects of networking and security can be explained using demonstrations with computer applications. For example, pinging another computer on the network is useful to explain basics of protocols and delay. I would like to be able to show such demos during the lecture.
- Some students would like (at least) audio recordings of my lectures. One reason is because of the language: English is a second, and hard-to-understand, language for some students. Other reasons may be to catch up missed lectures or to re-visit the more confusing parts of my lectures.
- I need to lecture in different rooms, which have standard equipment (projector, microphone, whiteboard) that may be used by others. In some cases, this leaves me with just five minutes to setup at the start of the lecture.
Given these requirements, my use of Ubuntu Linux as an operating system (and the F/OSS that comes with it), and my preference to use commonly available software/hardware (i.e. not be too dependant on specialist software/hardware that may not exist next year), I have arrived at using the hardware and software setup described in the rest of this article for my lectures. In summary, I describe:
- The physical setup of the equipment in the lecture room.
- Use of workspaces (or virtual desktops) in Ubuntu Linux for multiple applications.
- Suggestions for presenting slides, as well as making demos with other software easier for students to see.
- Using a Wacom tablet and graphics software (GIMP) to write on the screen, as opposed to using a whiteboard.
- Recording the lecture and then posting a screencast on Youtube.
I don't expect the exact setup I use will be applicable to many others. However some of the suggestions and techniques I use may be adapted to make other presenters lives easier.
Physical Setup
The setup I use in lecture is shown below.
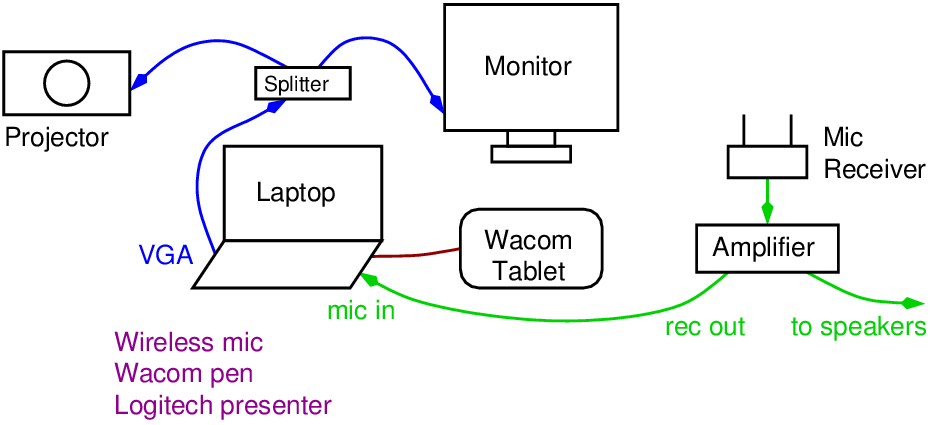
I connect my laptop VGA output to the splitter, which then duplicates the video to both a monitor on the desk (for the lecturer) and the projector (for the students). A wireless microphone connects into an amplifier which outputs to the speakers. I connect the recording output of the amplifiers to the microphone input on my laptop to record audio. (There is also the possibility to connect the audio output of the laptop to the amp to play audio over the speakers). I also use a Wacom Bamboo Pen and Touch CTH470 tablet for handwriting examples on the screen (as opposed to the whiteboard on the wall), and a Logitech R800 laser pointer/presenter. Each lecture room at SIIT includes the projector, monitor, splitter, amp and microphone: I bring my own laptop, tablet and pointer.
Workspaces
When connecting the projector (and external monitor via the splitter) to the VGA output of the laptop, I effectively have one big display: the 1366x768 laptop display on the left and the 1024x768 projector/monitor display on the right. I will refer to the projector/monitor portion as the "screen". During the lecture only I can see what is on the laptop display, while students see what is on the screen display (I also see it on the external monitor). As I often want to show students different applications (slides, notes, terminal, web browser), I use workspaces (also called virtual desktops) in Ubuntu to switch between them.
You can enable workspaces in Ubuntu via System Settings -> Appearance -> Behaviour. By default there are four workspaces. With the projector connected, my desktop can be viewed as four workspaces, each with the left part displayed on the laptop and the right part displayed on the screen (projector and external monitor).
 |
 |
 |
 |
Settings and shortcuts I use include:
- Ctrl-Alt-Left/Up/Right/Down to switch between workspaces. For example, while in workspace 1, press Ctrl-Alt-Down to move down to workspace 3.
- Launcher is shown only on the laptop display, not on the screen. This can be set via System Settings -> Displays.
I use the workspaces for quick switching between different applications I may want to use during a lecture. My typical setup is:
- Lecture slides
- Web browser, supporting slides or handouts
- Handwritten notes
- Terminal, images and other applications
Workspace 1 and 3 are almost always used as the lecture slides and handwritten notes, respectively. Depending on the lecture, the applications used in workspaces 2 and 4 may differ. An example is shown below. The rest of this article explains how I setup and use these applications during the lecture.
 |
 |
 |
 |
Presentation: Evince, Okular and LibreOffice
I primarily use LaTeX to produce my lecture slides and so when presenting use a PDF viewer. I use the default PDF viewer in Ubuntu, evince.
Some material I present using LibreOffice Impress. This has a nice multiscreen view: upcoming slides and timing are shown on the laptop screen, while the current slide is shown on the screen.
Later I explain how I make handwritten notes on the screen using GIMP and a Wacom tablet. I use these notes mainly for examples which are separate from the slides. However if you want to make notes directly on the slides then there are at least three options:
- LibreOffice Impress allows you to write on slides during a presentation. Right-click on a slide and select Mouse Pointer as Pen from the context menu and start writing. I've used this and it works fine with a tablet for writing. However it doesn't support straight lines or a grid, which I often use for drawing pictures. Also, the writing you add to a slide is not saved; closing the presentation removes all the writing. This is a problem if you want to return to some notes at a later time or you want to make the notes available to students.
- The Ubuntu PDF viewier, evince, does not support adding annotations, but Okular does. I've tried it on several occasions and it allows a range of different annotations to be added to a PDF presentation: handwriting, typed notes, highlighting, straight lines and simple shapes. It also saves the annotations to a separate file.
- Convert your (PDF) slides to images (e.g. using ImageMagick) and then open them in GIMP (see Handwritten Notes: GIMP with a Wacom Tablet). This would only be useful if you know in advance of the lecture that you want to make notes on the slides, and preferably only on a small selection of slides.
In summary, if you want to make notes on slides I recommend using Okular.
Web Browsing: Privacy in Firefox
Often I will visit web sites to show examples of technologies and concepts during the lecture. Some suggestions for using a web browser, specifically Firefox, during lecture include:
- Run the browser in private mode (e.g. in Firefox select File -> New Private Window). This keeps your browsing habits private from the class and also allows you to show web pages from how a student would first see it.
- Another measure of privacy is, if you use the address or location bar to search or type in URLs, then turn off suggestions (i.e. auto-complete, auto-suggest). In Firefox, go to Preferences -> Privacy and set When using the location bar, suggest: to Nothing.
- To save time, pre-load the web sites you are going to visit during the lecture into multiple tabs. This allows for quick switching between different web sites, and also means you can view the websites even if you lose network connectivity (see What Can Go Wrong?).
- Zoom in to the web page to make the important parts viewable on the screen. In Firefox use the keyboard shortcuts Ctrl + to zoom in and Ctrl - to zoom out. This only works on the web pages however; see Zoom on the Desktop for how to zoom in to other parts of the browser (e.g. menus, dialog boxes, certificate information).
Other Applications: Terminal, Images, Calculator, Clock, ...
I try to use demos in my lectures, as opposed to just talking with lecture slides. Most of my demos use software I am familar with, which is the main reason I use my own laptop for lectures. Some applications I use include: Terminal for command line demos of network and security operations in Linux; Calculator (and bc) for performing calculations; Octave for plotting signals and other data; Audacity for viewing audio data in the time and frequency domain; Wireshark to view captured packets on the network; VirtualBox and virtnet for some more realistic network/security demos; and of course a web browser (Firefox) for showing info on websites and demonstrating protocols and security attacks. The following are some suggestions to make it easier for students to view some of these applications on the screen.
Terminal for Command Line Demos
I sometimes use a terminal to demonstrate networking and security operations on the command line. There are several things you can do to make it easier for the class to view the terminal.
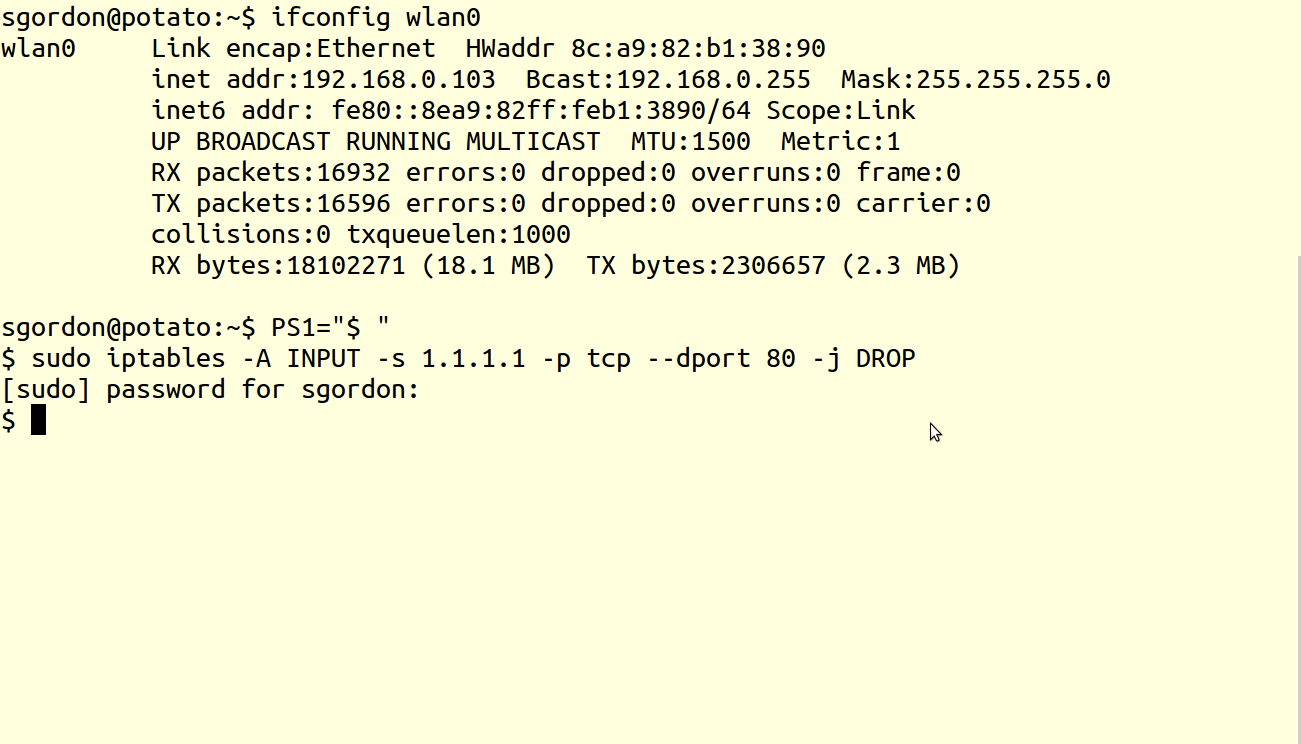
- Use zoom (Ctrl + andCtrl -) to make the text/window as large as possible, but at the same time avoiding too much wrapping of lines when output is displayed. For example, if executing ifconfig, then zooming too far will result in each line of output wrapping, make it very hard to read.
- Make the terminal full screen using the F11 keyboard shortcut.
- Change the colour (scheme) of the Terminal. In the menu go to Edit -> Profiles... and create new profile, for example called Lecture, based on the default profile. Edit the profile and on the Colors tab select your scheme. I prefer the built-in scheme Black on light yellow. You may change other options as well, e.g. font. Now when opening a Terminal for a lecture just select the Lecture profile.
Terminal colour scheme and prompt - If you are using multiple terminals in a demo (e.g. one terminal for your computer and another terminal for logging in to another computer) then consider using different colour schemes/profiles for each terminal. That may make it easier for the students to follow when switching between terminals. (Here is an example of using five colour-coded terminals for different virtual machines in a network).
-
Change the default prompt, which shows your username, hostname and current working directory, to a shorter prompt. You can change the prompt by setting the PS1 environment variable. For example for a prompt with only a dollar sign ($):
This can be useful to save some space so that long input commands will not wrap, and also to avoid having to explain the username, hostname and path. However if you are teaching how to use the command line, then its probably best to stick with the default prompt (so students new to the terminal are familiar with it when trying themselves).sgordon@potato:~$ PS1="$ " $ echo "hello" hello $ - Make a directory for your demos, e.g. demo that you use as a working directory. Then it is easier to keep the directory clean, meaning output of a ls will be relevant to the class.
Viewing Images with EOG
When I have images to display I use the default Ubuntu image viewer, Eye of GNOME or eog. It supports scrolling through multiple images and zoom with Ctrl + andCtrl -. In the Preferences, I set the background colour to white and the transparent parts to be the same colour. That way, transparent PNG images are shown with a white background.
Using a Calculator
I sometimes use the default Ubuntu Calculator, usually in Advanced mode, sometimes in Programming mode (for conversion between hex, binary and decimal). Nothing to suggest about using it, other than if you want to zoom in so it is easier for the class to see on the projector screen, see Zoom on the Desktop.
If you want to do large, accurate calculations (e.g. for cryptography examples) or need to easily see a history of calculations, use bc on the command line. Be aware that bc by default uses no decimal places; use the scale option to allow more accurate decimal answers.
$ bc
bc 1.06.95
Copyright 1991-1994, 1997, 1998, 2000, 2004, 2006 Free Software Foundation, Inc.
This is free software with ABSOLUTELY NO WARRANTY.
For details type `warranty'.
1000000 / 24
41666
1000000 / (24 * 60)
694
1000000 / (24 * 60 * 60)
11
scale = 5
1000000 / (24 * 60 * 60)
11.57407
123456789 ^ 99
11481079911316653231716989042831355904634048462812497359048016691854\
48933261164100492984822324956937703914143052434964338629820400466161\
58276711732777264784850344872576010910750199256447057376502051609775\
77139818739847146688385751294630709265106441686536149478712343874368\
81945258474617800659512499223386092660371338157407661633602918605092\
25103260428051285502621436142668549020741048680999770761773095219647\
24173572416852834154730042457848315372689094596983466292822334860128\
17910424433527473719518760222174239739370524471900171991956679352456\
63467458526085819382657104838612657412975895934029584995704353732049\
66174185276011001564085432163270508342451429144902785629006754146915\
18797158973853625610908260601859322700655173648322959855328760386810\
637122135737573587031338226868347170501229759984584109
quit
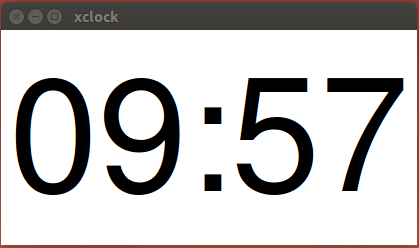
Clock
I use xclock with a larger font to display a clock I can easily see on the laptop. I create an alias, called lclock, so I don't have to remember/type the options to start the clock. If using Bash shell (default in Ubuntu) then add the following line to either the file ~/.bash_aliases or ~/.bashrc (~/.bash_aliases is preferable and should work, but if it doesn't then try ~/.bashrc).
alias lclock='xclock -digital -brief -face Helvetica-120'
Now open a new Terminal and start the clock:
$ lclock &
Zoom on the Desktop
The default size of text in applications is usually to small to read from a distance when displayed via the projector. Luckily many applications have their own zoom capabilities which should be used to make the text a reasonable size. For example, you can zoom in/out in Firefox, a Terminal and EOG (the default image viewer in Ubuntu) using the Ctrl + and Ctrl - keyboard shortcuts. However some (parts of) applications do not support zoom. Two examples are the default Calculator in Ubuntu as well as the menus and dialog boxes in Firefox (the zoom in Firefox only zooms on the web page; if I want to show students a web server certificate that Firefox has, the Firefox zoom feature cannot be used). For these cases its useful to have a general way to zoom into the desktop. In Ubuntu I use the accessibility features that offer zoom, specific the Enhanced Zoom Desktop plugin of Unity/Compiz.
To use and setup the Enhanced Zoom Desktop plugin, install CompizConfig Settings Manager (CCSM) and some extra plugins (I can't recall if I needed the extra plugins for zoom or something else??). In a Terminal run:
$ sudo apt-get install compizconfig-settings-manger compiz-plugins-extra
Now start CCSM.
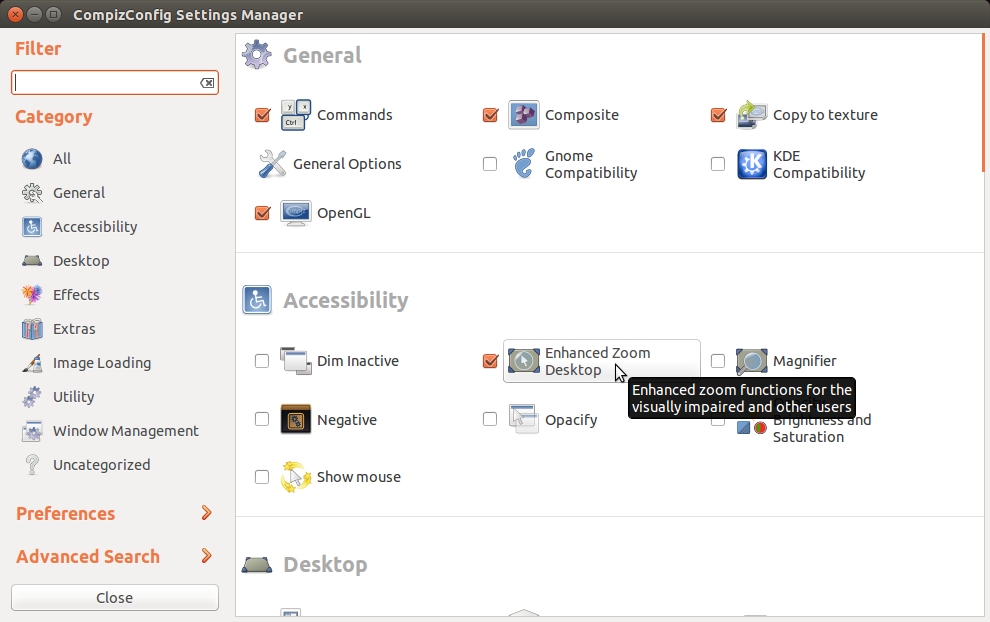
In the Accessibility plugins select and click on Enhanced Desktop Zoom. You need to set some keyboard shortcuts (or mouse buttons) to allow zooming in and out. In my case, I set the keyboard shortcuts to be Ctrl-Alt-[ and Ctrl-Alt-] for zoom in and out, and Ctrl-Alt-\ to return to the normal (no zoom) view. I also set an option that allows the mouse to smoothly pan while zoomed in.
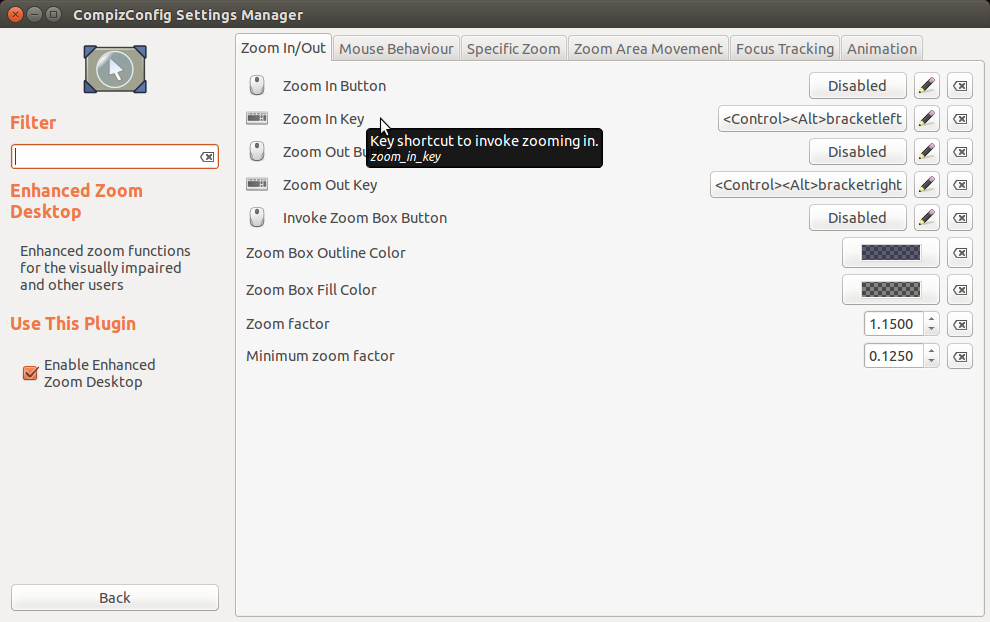
I set the following to provide my desired behaviour of the zoom. You may experiment with other options to get the setup that works best for you.
- On the Zoom In/Out tab:
- Zoom In Key: Ctrl Alt bracketleft
- Zoom Out Key: Ctrl Alt bracketright
- On the Mouse Behaviour tab:
- Zoom Mode: Pan Area
- On the Specific Zoom tab:
- Zoom Specific Level 1: Ctrl Alt backslash
Handwritten Notes: GIMP with a Wacom Tablet
Examples of the concepts I teach usually involve calculations or drawing pictures (e.g. exchange of protocol messages, block diagrams of components, protocol stacks). I often do not include these examples in lecture slides, but rather write/draw them during the lecture. Instead of using the whiteboard, I write on the screen, with the intention that it is a bit easier for students to read, that the notes can be made available after the lecture, and can also be viewed in the screencast. To write on the screen I use a Wacom tablet and GNU Image Manipulation Program (GIMP).
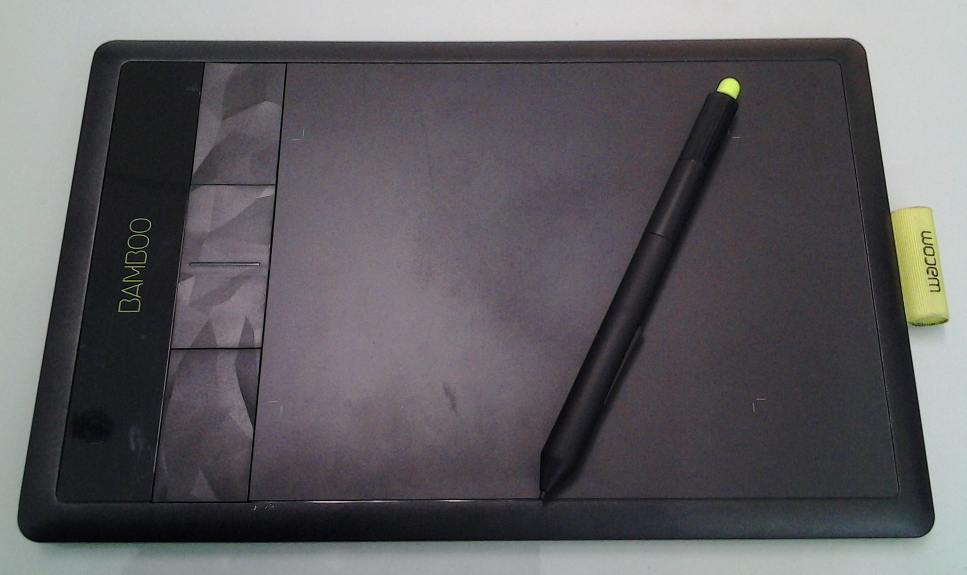
A Wacom tablet and GIMP may not be the perfect combination—a normal (Android, iPad) tablet with digitizer would allow you to write directly on the screen, other software can do handwriting recognition—but for me it meets my requirements of being able to do everything on the laptop, reasonably cheap and producing reasonable quality handwritten notes. The following describes the setup I use. Getting things setup at the start takes some effort, especially as a new user to GIMP, but onces its done using it in the lecture is quite easy.
Setting Up the Wacom Tablet
I have a Wacom Bamboo Pen and Touch Tablet (CTH470) which connects via USB into the laptop. Wacom tablets have good driver support in Linux, and my tablet works out of the box on Ubuntu 14.04. However some settings may need to be changed to suit your use of the tablet. The Ubuntu documentation has a good introduction and points to valuable forum threads on the many different options available. Here I'll just list the important settings that I use, in particular turning off the pad part of the tablet and setting the "resolution" to work well with dual screen (laptop plus external).
The Wacom Bamboo Pen and Touch Tablet allows you to use the tablet as a touchpad with your fingers. I don't need or want this touchpad functionality during lectures so I turn it off (leaving it on causes problems when your hand brushes the tablet while writing). To turn off the touchpad, in a terminal run:
$ xsetwacom set "Wacom Bamboo 16FG 4x5 Finger touch" Touch off
If you have a different tablet, then the name of the feature may not be the same as above. You can see the devices and parameters with:
$ xsetwacom list devices
$ xsetwacom list parameters
See the man page for xsetwacom and the Ubuntu Wacom documentation for further explanation of the devices and parameters.
Next I set the mode of the stylus (and eraser, which is the other end of the stylus) to be Relative. By default the mode is Absolute, which means when you stop using the stylus the mouse pointer returns to where the mouse was before starting using the stylus. With Relative mode you effectively have two mice: the laptop mouse (touchpad) and the stylus. I prefer Relative mode, but you may try it with Absolute. To set to Relative mode:
$ xsetwacom set "Wacom Bamboo 16FG 4x5 Pen stylus" Mode Relative
$ xsetwacom set "Wacom Bamboo 16FG 4x5 Pen eraser" Mode Relative
I've also tried setting some other options, like programming the two buttons on the tablet to correspond to keyboard shortcuts, but I tend not to use them; I just use my laptop keyboard.
The last configuration of the tablet is perhaps the most important. The difficult thing of using a Wacom tablet is that you must watch the screen (in my case the external monitor) while writing. It takes some practice (make sure your tablet and screen are well aligned/positioned) but eventually you can write quite neatly, at least at the size which will be viewable in a lecture. The practice allows you to coordinate the movements of the pen on the tablet with the movement of the pointer on the screen. The default setup of the tablet provides a good mapping between the tablet and screen: a movement of the pen produces a movement on the screen of the magnitude that you would expect.
The above coordination of pen and pointer works ok while using just a laptop (or PC). But when you plug in an external monitor (or projector) the display size is almost doubled. See my workspace pictures at the top of this article: before plugging in the external monitor the display was just the green laptop box; after plugging in, the display is now the green laptop box plus the red screen box. The problem: a small movement of the pen on the tablet now produces a larger movement of the pointer on the screen. All your practice writing is useless. I spent almost an entire semester with this problem, not realising why I could write neatly in my office, but when it came to the lecture I lost control!
To overcome this problem, when you plug in a second screen, you need to modify the speed at which the pen causes the pointer to move. I don't fully understand them, but there are three parameters to that control this movement: Constant Deceleration, Adaptive Deceleration and Velocity Scaling. The default values are 1, 1 and 10, respectively. Below is an example of setting them to 3.5, 1.15 and 10, respectively.
$ xinput set-prop "Wacom Bamboo 16FG 4x5 Pen stylus" --type=float "Device Accel Constant Deceleration" 3.500000
$ xinput set-prop "Wacom Bamboo 16FG 4x5 Pen stylus" --type=float "Device Accel Adaptive Deceleration" 1.150000
$ xinput set-prop "Wacom Bamboo 16FG 4x5 Pen stylus" --type=float "Device Accel Velocity Scaling" 10.000000
These are the values I use. But you should try for yourself, changing the values while using dual screen (i.e. as you would be in the lecture), and seeing what works best for you. Below are two examples of my writing: on the left is before I set the acceleration parameters and on the right is after discovering the problem and setting as above.


Setting Up GIMP
As its full name says, GIMP is a program for manipulating images, i.e. similar to Photoshop. I am not sure if it was the best choice, but after some effort getting the settings correct, I now find GIMP to be ok for handwriting with the Wacom tablet. Although I haven't done a rigorous comparison with other options (I've briefly looked into Xournal and Inkscape), some features that GIMP allows me to do that are useful include:
- Produce smooth, neat handwriting.
- Draw pictures, including using straight lines and rectangles, i.e. using a grid.
- Switch between pen colours easily.
- Load existing images, and write on top of them.
- Use layers. Transparent layers are especially useful for having a single base image/text, then writing on top of it, then removing that writing and adding different writing on top of the base image.
- Do all of the above without having to switch between windows or open menus. (GIMP allows the colour and layering windows to be on the laptop screen which students don't see, while the writing is on the projector screen).
Below is an example of my workspace when using GIMP. The layering, tool and colour palette are on the laptop screen (seen only by me), while the drawing canvas is on the projector screen (seen by students). In the following I try to summarise how I setup GIMP on my computer (i.e. setting Preferences), and then how I use it for handwriting in each lecture.
In User Interface press Configure Keyboard Shortcuts....
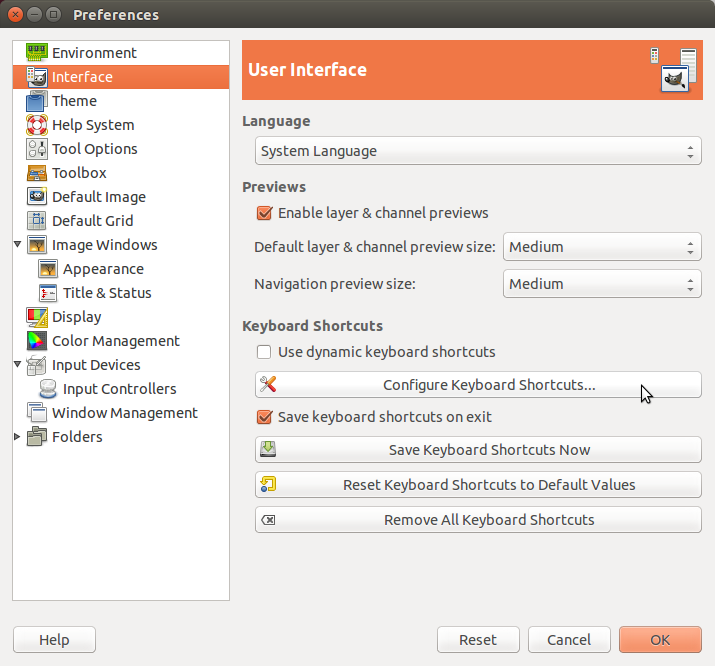
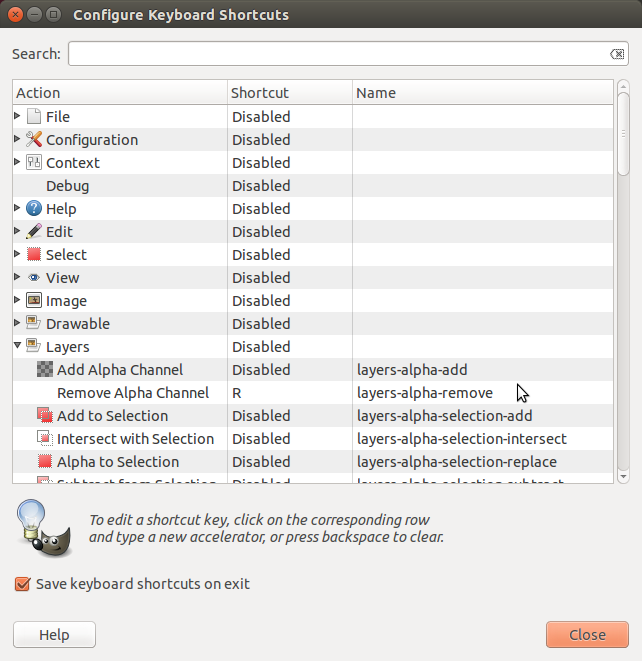
Now browse/search through different options and set desired keyboard shortcuts. I use the following shortcuts (some may already be set. Also carefully note the shortcut "name"; some actions are very similar, in which case the name distinguishes them). I will explain the use of these shortcuts later. Once you have set them, press Save Keyboard Shortcuts Now.
| Action | Shortcut | Name |
|---|---|---|
| Remove Alpha Channel | R | layers-alpha-remove |
| New Layer | N | layers-new-last-values |
| Eraser | E | tools-eraser |
| Paintbrush | P | tools-paintbrush |
| Show Grid | G | view-show-grid |
| Snap to Grid | S | view-snap-to-grid |
| Undo | Ctrl-Z | edit-undo |
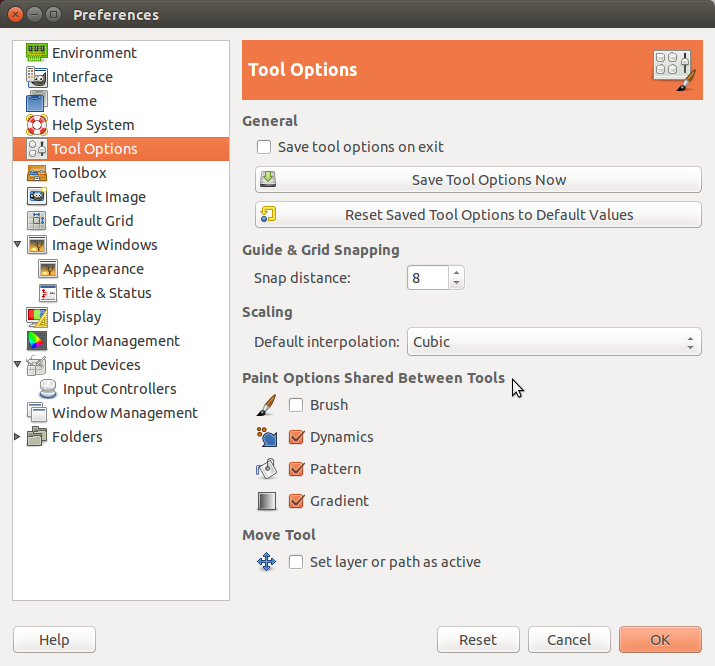
In Tool Options under Paint Options Shared Between Tools, de-select Brushes. This means you can set the size of the brush used by the Paintbrush tool (for writing) to be different than that for the Eraser tool (for deleting). I set a small Paintbrush brush size (5) and large Eraser brush size (20) so it is quicker to delete.
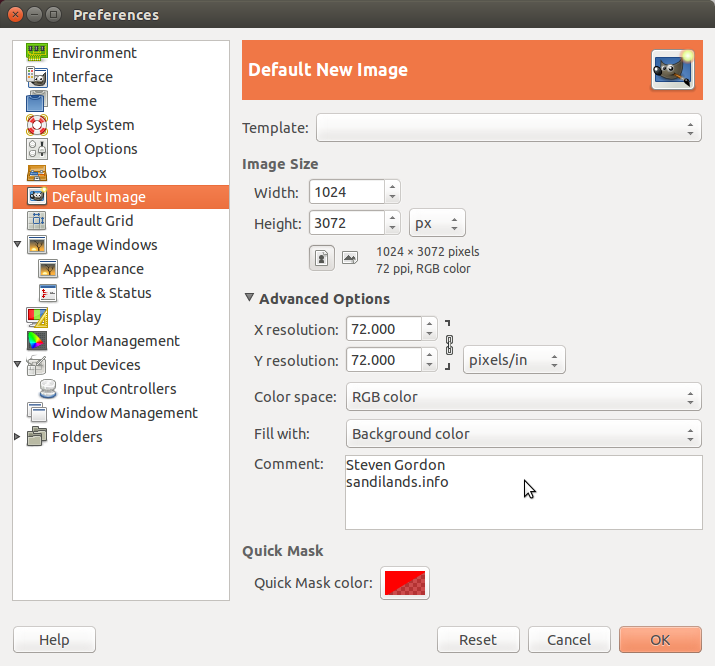
In Default Image, set the width and height to be that desired for your screen. I set the width to be the same as the projector resolution width (1024) and the height to be 4 times the projector resolution height (4 * 768 = 3072) so I have enough space to write on a 'single page'. I start a new layer when I get to the bottom of the 'page'.
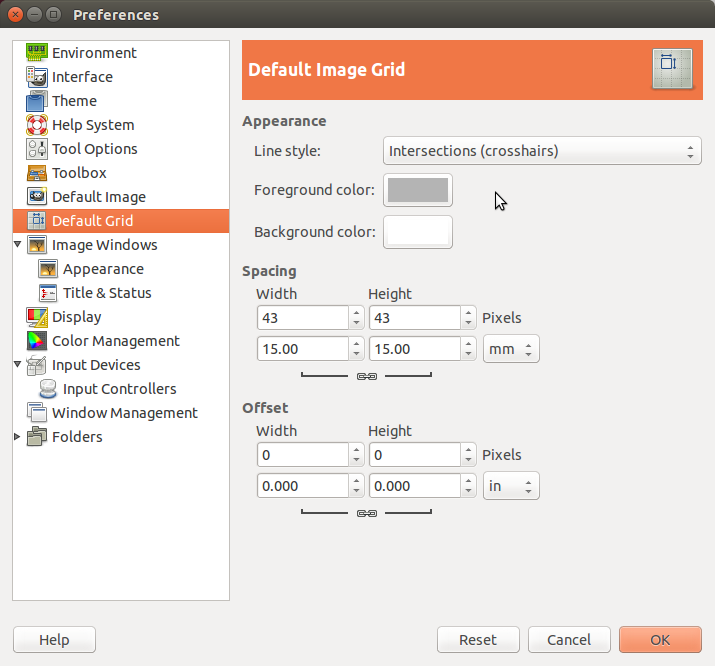
In Default Grid, set the line style, foreground color and spacing as you desire. I use crosshairs and a light grey foreground to make the grid noticeable but so it doesn't stand out too much.
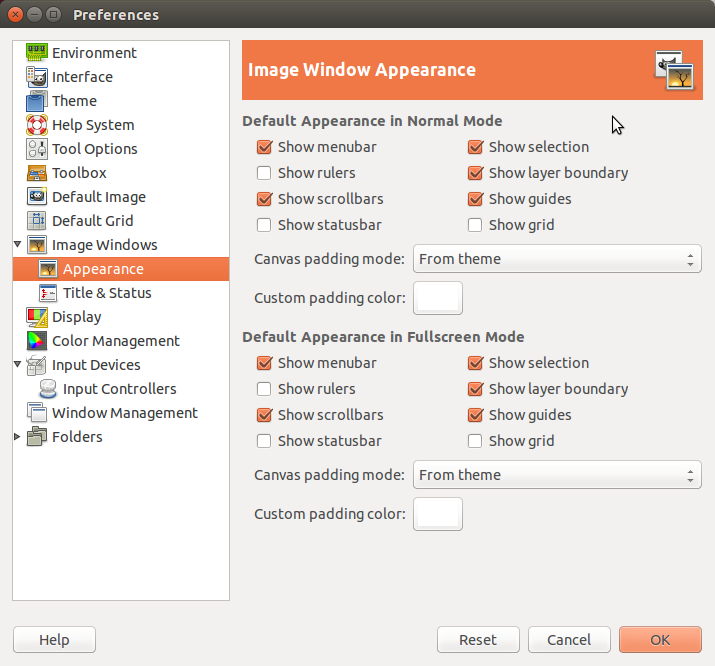
Under Image Windows in Appearance, (de-)select the items that you want shown upon startup. I hide the rulers, statusbar and grid. (Later I create a shortcut for showing the grid).
Once you have positioning the GIMP windows to where you want them (e.g. image on the right screen, Palette Editor, Layers and Tool Options on the left screen), then in Window Management select Save Window Positions Now and de-select Save window positions on exit. Now whenever you start GIMP, the windows will be positioned correctly for the lecture.

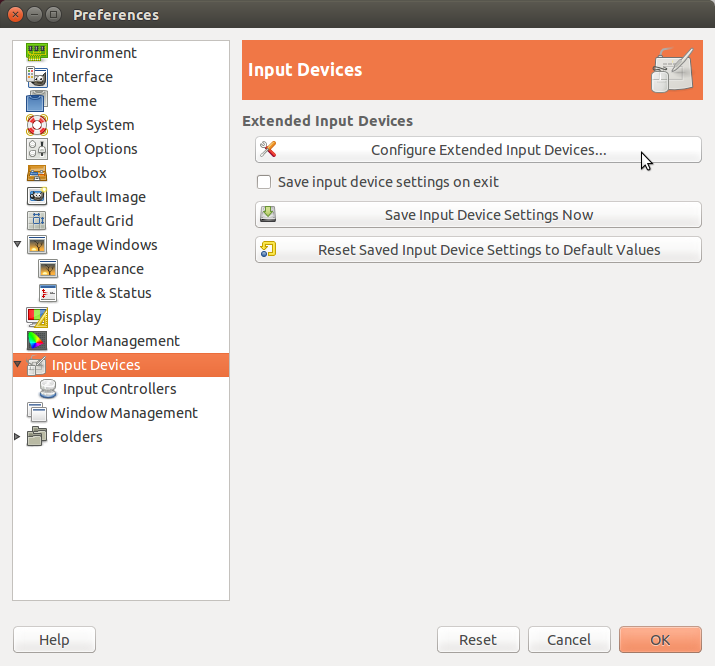
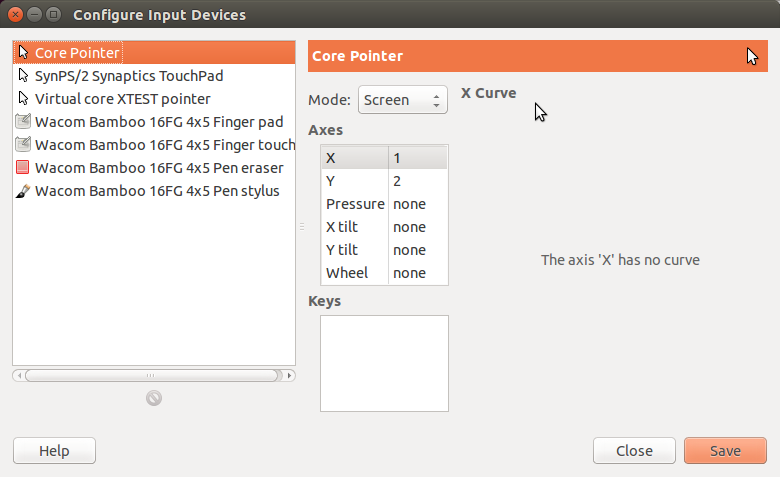
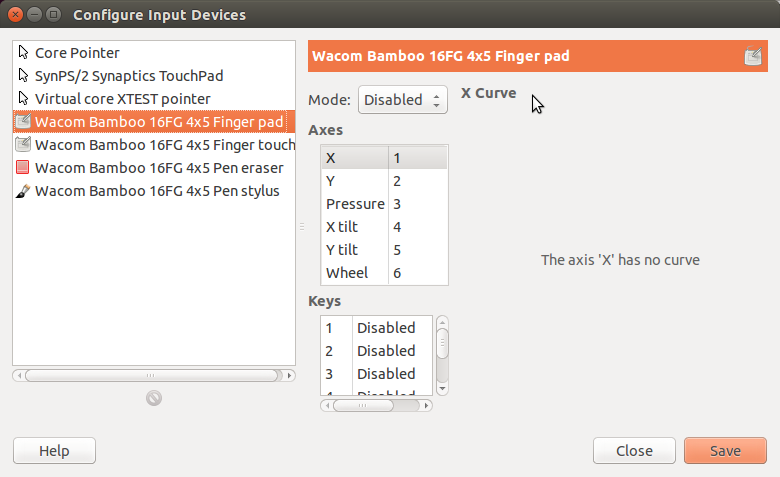
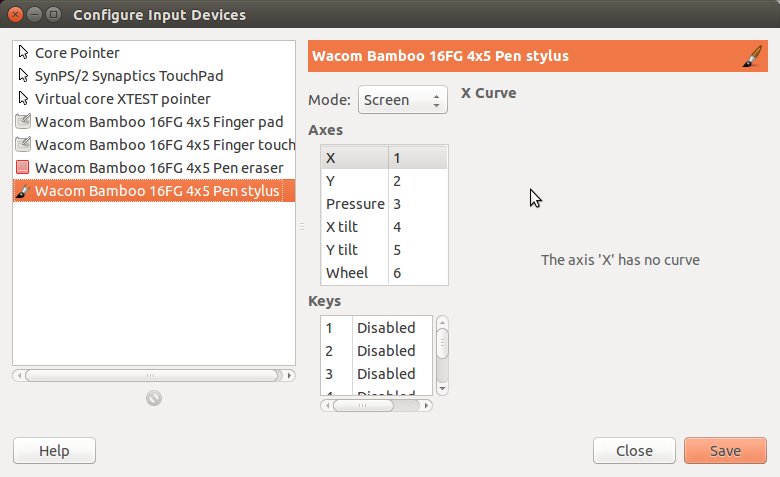
In Input Devices press Configure Extended Input Devices.... This allows you to select the mode and other options for the different input devices. The input devices depend on your computer and tablet, but there should be a Core Pointer, Touchpad (for laptop), and if using Wacom tablet a set of input devices for that tablet. I don't fully understand all the options and will attempt to explain those that I do. In short, select the Mode to all input devices you will use to Screen. However for the Wacom tablet you may want to disable the Finger pad and Finger touch (they are the features on the Wacom Bamboo Pen and Touch that allow you to use your hands, similar to a touchpad on a laptop). To disable them, set the Mode to Disabled. Alternatively you may disable these via the command line.
Using GIMP
With the correct preferences set, when you open GIMP at the start of the lecture the windows will be in the desired position and you will be ready to start writing. Here is how I perform some common operations during a lecture:
- Handwriting: Use the stylus on the tablet with Paintbrush tool (keyboard shortcut P)
- Straight line: Touch the stylus on the tablet at the start point, then press and hold Shift. Lift the stylus, but still holding Shift, and move the cursor to the end point. Touch the stylus to the tablet and release Shift.
- Straight line, horizontal/vertical : Same as above of drawing a straight line, but also press and hold the Ctrl key after pressing the Shift key.
- Show a grid: Keyboard shortcut G. Press G again to hide the grid.
- Snap to grid: Keyboard shortcut S. Lines will automatically snap to the grid points without holding Shift, but still use Shift to get exact 90 degree angles. Press S again to stop snapping to the grid.
- Delete (undo): Ctrl-z undo's the previous lines and is useful as a way to erase a mistake immediately.
- Delete (erase): Keyboard shortcut E turns on the eraser tool; use the stylus as an eraser. Press P to return the paintbrush tool. Note: if you are using layers, the eraser will erase what is on the current layer, possibly revealing images from a lower layer. To avoid this you should Remove Alpha Channel before erasing (keyboard shortcut R). Hence I prefer using undo instead of the eraser.
- Change pen colours: click on the desired colour from the palette using the stylus.
- Add a new layer: In the Layers - Brushes window, right click on a layer and select New Layer. Select the Layer Fill Type to be transparent or white, depending on whether you want to also see whats on the lower layers or not. An alternative is the keyboard shortcut N to create a new layer using the previous values of Layer Fill Type.
- Save the image: Ctrl-S
Other useful features of GIMP include Open as Layers ... from the File menu which allows you to load existing images as new layers and creating new layers (White or Transparent background) by right-clicking on a layer in the Layer window.
Screencasting: FFMpeg and Sox
I use ffmpeg to record the screen and SoX (in particualr the rec command) to record the audio. The commands to start each are put into a single Bash shell script which allows them to started and ended to (about) the same time. You can download my shell script, called screencast, and copy it you your bin directory (which should be in the PATH). You should at least browse through the script, and probably edit some parts, especially the names of the computers and screen sizes (they are hardcoded to my setup). I have described how it works on my article Multimedia on Linux Command Line - read that for a full explanation.
Once you have the screencast script, you can start it with:
$ screencast lecture example
where lecture refers to one of the screen resolution settings (see the script) and example is the base name of the files created. There is a 5 second delay before recording starts (to allow you to move to the desired window). To stop recording press 'z'. The output is two files:
- example-screen.mp4: H.264 encoded video of the screen, saved as MP4.
- example-audio.flac: FLAC encoded audio recording.
After the lecture I combine the screen and audio files to create a single audio file. Again, I have a Bash shell script, audioscreen2video to do this - it is explained further here. It can be run as:
$ audioscreen2video example 2014-12-25
producing an MP4 with AAC encoded audio. Now you have a screencast for making available to students. After some initial time hosting on our school server, I now just upload to Youtube: StevesLectures.
Other things to do after the lecture include exporting the notes made in GIMP to PNG and uploading to my course website. This is maybe the most time consuming part now (cropping each picture, exporting to PNG, inserting in Moodle with appropriate caption) and is the next thing I plan to improve.
What Can Go Wrong?
Many things.
To close, I will summarise some of things that have gone wrong in my lectures when using the above setup. Hopefully this will help others avoid these problems.
Writing on the Wrong Layer in GIMP
Sometimes I write on the canvas in GIMP but nothing is displayed. Usually the problem is that the currently selected layer (which the writing appears on) is not displayed (i.e. hidden). Use the Layers window to select the layer that you actually want to write on.
Window Manager Crashes
Although it doesn't happen too often, sometimes the Ubuntu window/display manager crashes, meaning I can't do anything. I guess it is due to the use of multiple displays and workspaces. Most times I've found after a few (tens of) seconds the display manager restarts and things are back to normal. Otherwise I don't have a solution other than to logout (or even reboot) and start again.
Bad Handwriting with Wacom Tablet
Of course your handwriting using the tablet will be no better than your handwriting on paper, but sometimes it significantly worse. I suggest making sure the tablet and external monitor are aligned and in a comfortable position, that you practice if it is your first time with a graphics tablet, and make sure the acceleration and scaling settings are appropriate for your Wacom tablet.
No (or Poor Quality) Audio Recorded
Very annoying to give a lecture, using the screencast script to record the screen and audio, and then find at the end of the lecture either no audio was recorded or the quality is very poor. First, check the obvious thing at the start of the lecture: cable plugged into correct sockets in both amplifier and laptop. Getting good quality audio can require more effort though. I suggest when first using a lecture room then test to record some audio (e.g. using Audacity). Its important to select a good combination of amplifier volume, microphone receiver level and Sound Settings input volume in Ubuntu such that the volume is appropriate for the lecture room and that the recorded audio is not too quite and defintely has no clipping. If you do end up with a poor quality recording, you may be able to improve it later in Audacity. For example, I've used Audacity to amplify the audio during some parts of the lecture and even remove some high pitch noise from the sound system.
Lose Network Connectivity
Not a problem for lecture slides or handwriting, but is not so good if using the web browser or ping to demonstrate networking concepts and your laptop doesn't have network connectivity! The cause has mainly been the campus WiFi network. Only suggests are to test at the start of the lecture and have some wbe pages preloaded as a backup.
Created on Sun, 14 Dec 2014, 7:41pm
Last changed on Sun, 14 Dec 2014, 8:02pm